The Ultimate Guide to Fluffing a Faux Christmas Tree: Making Your Artificial Evergreen Look Real
Does your artificial Christmas tree look deflated after being pulled from storage? Don't even think about decorating until you've read this guide! We walk you through the precise fluffing technique—working section by section, tip by tip—to eliminate sparse spots, cover the central pole, and give your tree the fullness of a real evergreen. Get ready for your best-looking tree yet!
HOLIDAY DECOR
Virtual Home Goods
12/7/20254 min read

My The moment you pull your artificial Christmas tree out of storage, it can look a little... deflated. Those tightly packed branches, once so full and vibrant, now resemble a sad, green stick figure. But don't despair! With a little patience and the right technique, you can transform your faux evergreen into a magnificent, full, and realistic-looking centerpiece.
This isn't just about bending branches; it's about understanding the art of tree fluffing. Let's dive in!
Why Fluffing Matters (and What It Really Means)
Think of your artificial tree as a blank canvas. When it's new or just out of the box, the branches are compressed for shipping or storage. Fluffing is the process of individually shaping each branch and "tip" to fill out the tree's silhouette, eliminate gaps, and create a natural, organic look. It's the difference between a sparse, obviously fake tree and one that looks like it was just cut from the forest.
It’s also surprisingly therapeutic once you get into a rhythm!
What You'll Need
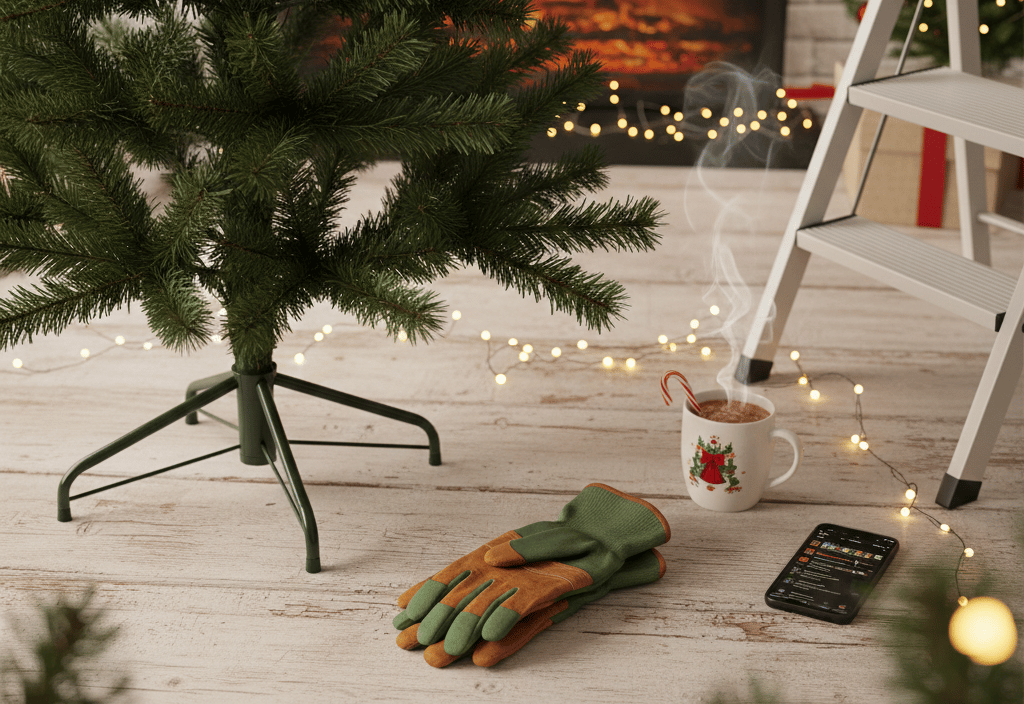
Gloves: Trust us on this one. Artificial tree branches, especially older ones, can be surprisingly scratchy. Gardening gloves or even sturdy dish gloves will save your hands.
A Stepladder or Stool: Essential for reaching those higher branches safely.
Good Lighting: You need to see the gaps! Natural daylight is best, but a well-lit room works too.
Time: This isn't a five-minute job. Depending on the size of your tree, allow 1-3 hours. Put on some Christmas music, grab a festive drink, and enjoy the process.
The moment you pull your artificial Christmas tree out of storage, it can look a little... deflated. Those tightly packed branches, once so full and vibrant, now resemble a sad, green stick figure. But don't despair! With a little patience and the right technique, you can transform your faux evergreen into a magnificent, full, and realistic-looking centerpiece.
This isn't just about bending branches; it's about understanding the art of tree fluffing. Let's dive in!
Pro Tip: Don't assemble the entire tree first. It's much easier to fluff each section individually, starting from the bottom, before adding the next one.
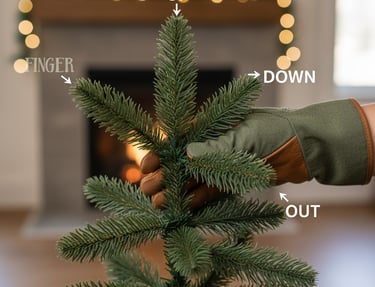
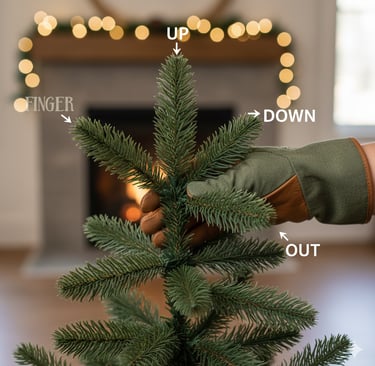
Step 2: The "Finger" Technique – Working from the Pole Out
Every branch on your artificial tree is made up of smaller "tips" or "fingers." The key to realism is to spread these tips out in every direction.
Find the main branch: Locate a main branch stem coming directly off the central pole.
Separate the tips: Most main branches will have smaller wire-framed tips attached. Take these tips and fan them out.
Up, Down, and Sideways: Don't just pull them straight out. Aim to point tips slightly upwards, downwards, and directly sideways.
One tip slightly up.
One tip slightly down.
One tip straight out.
This creates a varied, natural look and helps fill the space. Repeat this for every tip on every main branch in the bottom section. You should aim to completely obscure the central pole and the metal frame of the main branches.
Step 3: Layer by Layer, Section by Section
Once you've fluffed the bottom section, add the next section of the tree. Again, fluff it completely before adding the next one. This method allows you to work systematically and prevents you from missing spots or having to reach awkwardly through already fluffed branches.
Imagine a 360-degree sphere around each branch. Your goal is to fill that sphere with green.
Step 4: Pay Attention to the Inner Branches
Many people focus only on the outer tips, but the inner branches are crucial for creating depth and density. Make sure to pull some tips towards the center of the tree and slightly upwards to fill any voids near the trunk. This is where you hide the pole!
Step 5: Step Back and Assess (Often!)
This is perhaps the most important tip. Every 10-15 minutes, or after completing a section, step back from your tree. Walk around it. Look for any glaring holes or flattened sections. Where do you see the pole? Where does it look sparse? These are the areas that need more attention.
Step 6: The "Gap Filling" Round
After you've done a thorough initial fluffing of the entire tree, take a final pass. Go back to any areas that still look thin. You can gently bend entire main branches (if your tree allows) to cover larger gaps. Use the smallest tips to fill in minor imperfections.
Step 7: "Finishing Touches" for a Real Look
Vary the depth: Don't make all tips perfectly even. Some should protrude a little more, some recede, just like a natural tree.
Overlap: Allow some tips from upper branches to slightly overlap lower branches.
Look from all angles: If your tree is in a corner, you might focus more on the visible sides, but even the back needs some love to ensure the lights reflect well.
Common Fluffing Mistakes to Avoid
Rushing the process: Impatience leads to a sparse tree.
Only pulling tips outwards: This creates a flat, two-dimensional look. Remember to go up, down, and sideways!
Forgetting your gloves: Scratched hands will make the process miserable.
Not stepping back: You can't see the full picture when you're nose-deep in branches.
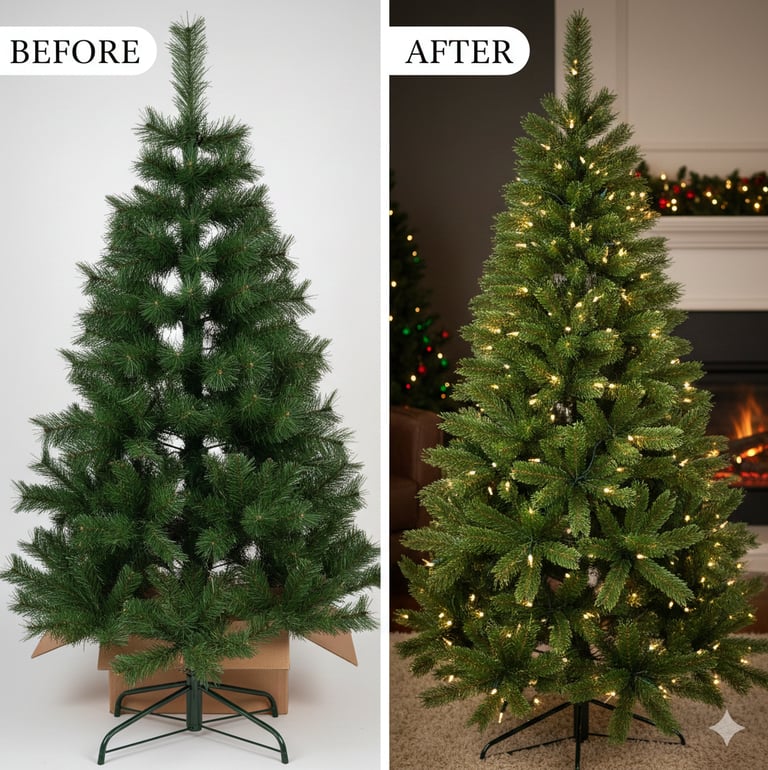
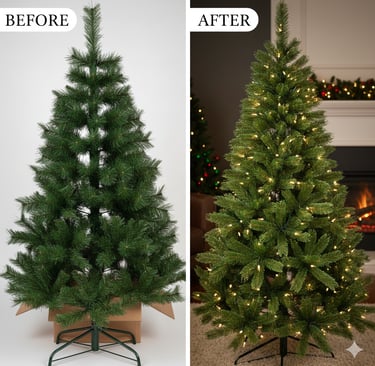
Your Tree is Now Ready to Decorate!
Once your tree is beautifully fluffed, you'll be amazed at the difference. It will appear much fuller, more realistic, and provide a much better foundation for your lights and ornaments. The effort put into fluffing will elevate your entire Christmas display.
Happy fluffing, and enjoy your stunning, realistic faux Christmas tree!